ZStack Cloud Platform
Single Server, Free Trial for One Year

Comprehensive product documentation and tools

Upholding the value of Customer First and the mission of Serving Customer, ZStack is dedicated to providing secure and stable services for customers.

To educate ZStack partners and interested individuals about cloud computing and to cultivate cloud computing talent.

ZStack provides innovative cloud infrastructure for ten major industries
The report provides three major
solutions and customer case studies for transitioning from VMware to ZStack.
Just last month, the Ministry of Industry and Information Technology and the Central Cyberspace Affairs Commission jointly issued a notice. Organize and carry out the special work of “network de-NAT” to further deepen the deployment and application of IPv6.
ZStack Cloud has supported IPv6 and IPv4/IPv6 dual stack in earlier versions, and provides various NAT capabilities such as load balancing v6 to v4 / v4 to v6 in the latest versions.
If users want to use native IPv6, they also need to understand how to use IPv6 cloud hosts and their networks. Therefore, we wrote this article, hoping to help everyone use IPv6 and deepen their understanding of IPv6.
The IPv6 Network Upgrade Plan is a national strategy aimed at accelerating the upgrade of China’s Internet infrastructure and promoting the widespread use of IPv6. IPv6 (Internet Protocol Version 6) is the next-generation Internet protocol with a larger address space and higher security. It is an important means to solve the problem of IPv4 address exhaustion. According to the requirements of the “Action Plan for Promoting the Large-Scale Deployment of Internet Protocol Version 6 (IPv6)” issued by the General Office of the Central Committee of the Communist Party of China and the General Office of the State Council, by the end of 2025, our country’s IPv6 network scale, user scale, and traffic scale will rank first in the world, and the network, applications, and terminals will fully support IPv6, completing the smooth evolution and upgrade to the next generation of the Internet. According to the “White Paper on the Development of IPv6 in China (2024)” issued by an authoritative organization, the number of active IPv6 users has reached 794 million, accounting for 72.70% of all Internet users.

The proportion of IPv6 traffic is also gradually increasing
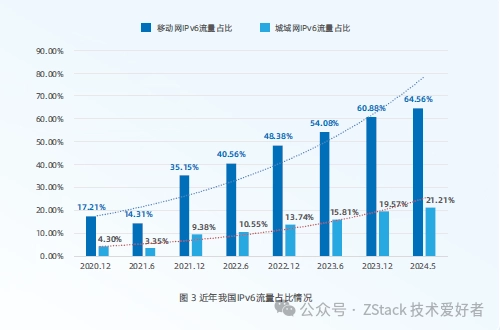
Therefore, IPv6 has become an increasingly important skill for cloud platform administrators, and it is also a skill that needs to be mastered urgently.
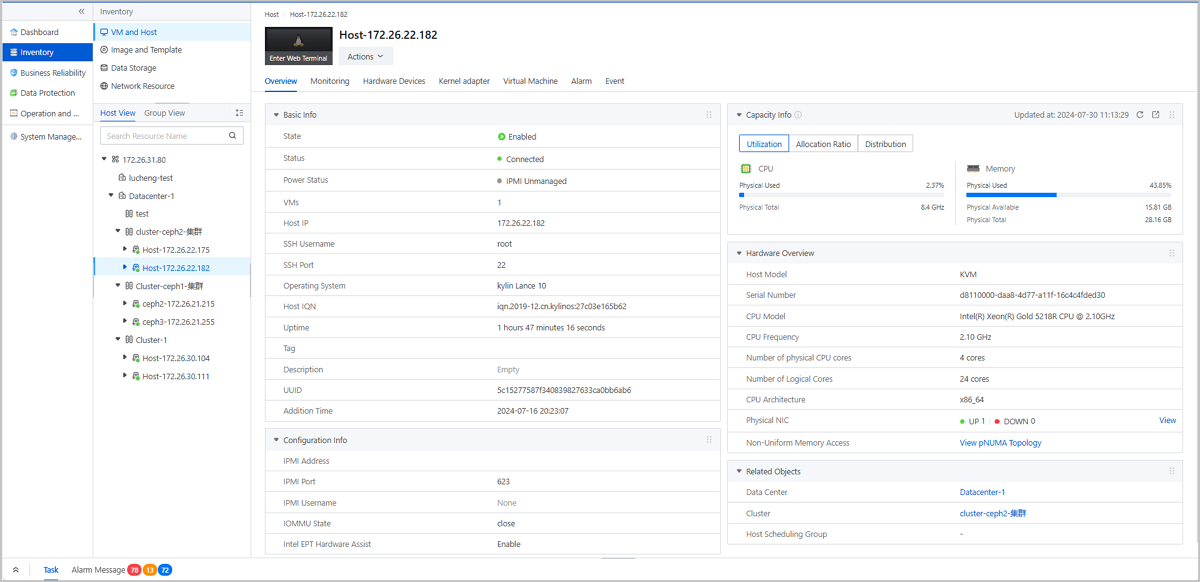
ZStack cloud platform provides users with a very convenient way to configure IPv6. We will use the example of connecting a ZStack cloud host to the Internet via IPv6 to demonstrate how to use the ZStack IPv6 network.
When applying for enterprise broadband, the operator will assign an IPv4 address, and you can also apply for an IPv6 address segment. Taking Shanghai Telecom as an example, you can get an uplink IPv6 address and an IPv6 address segment with a prefix length of 64 from the operator.
The details of the upstream IPv6 address configuration are omitted here. Let’s see how to configure the internally available IPv6 address segment. The configuration of different switches is slightly different. Here we take the Centec switch as an example. Configure this IPv6 address segment on the switch and turn on routing announcement.
interface vlan31
description Test For QA
no ipv6 nd ra suppress
ipv6 address 240e:xx:xx:xx::1:1/112
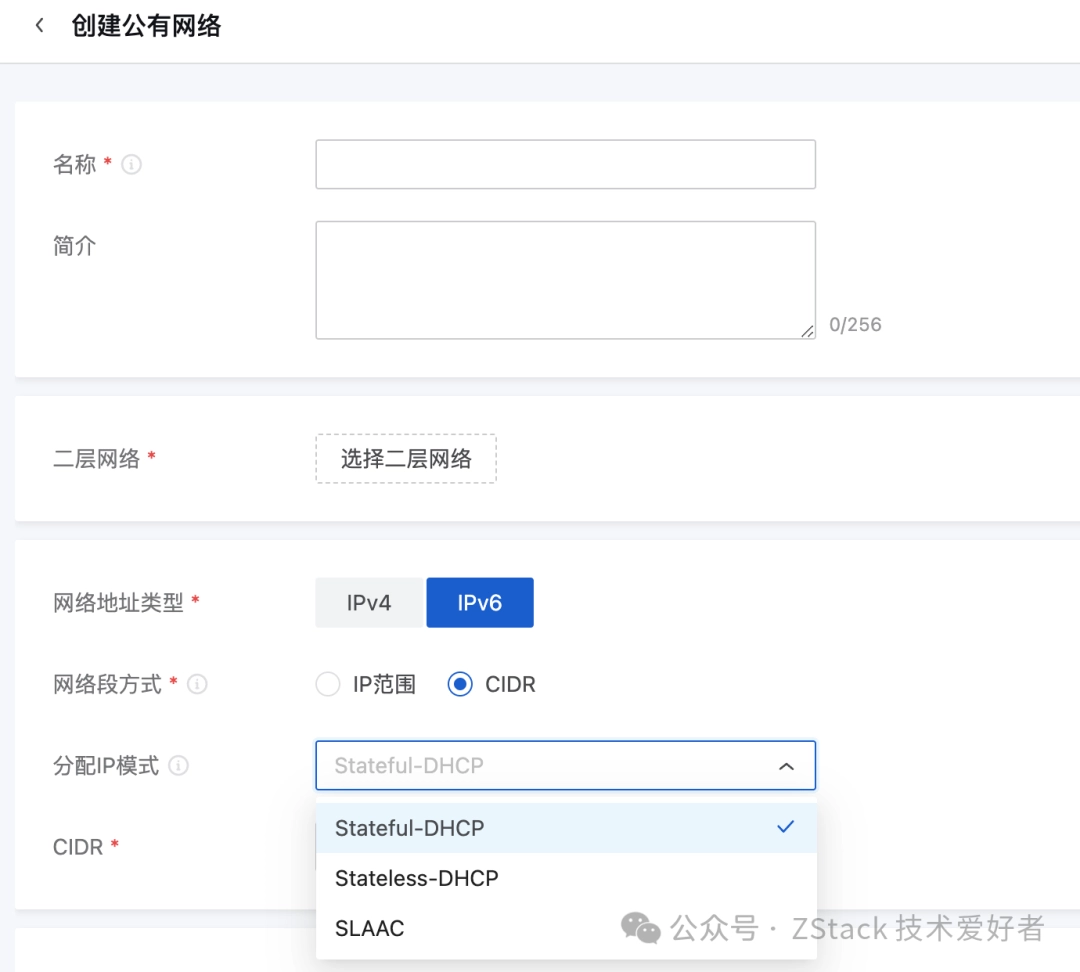
Create a flat network on the cloud platform and configure the IPv6 address segment. ZStack Cloud supports multiple IP allocation methods such as Stateful-DHCP, Stateless-DHCP, and SLAAC. Here we choose Stateful-DHCP:
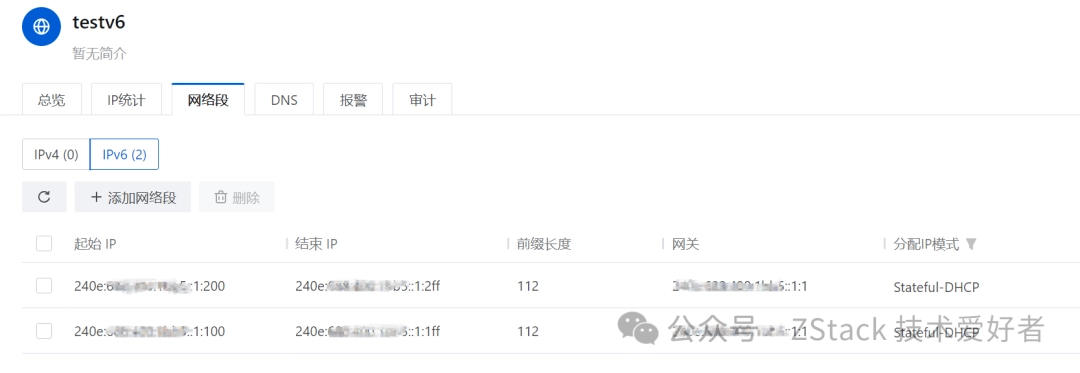
The created network is as follows:
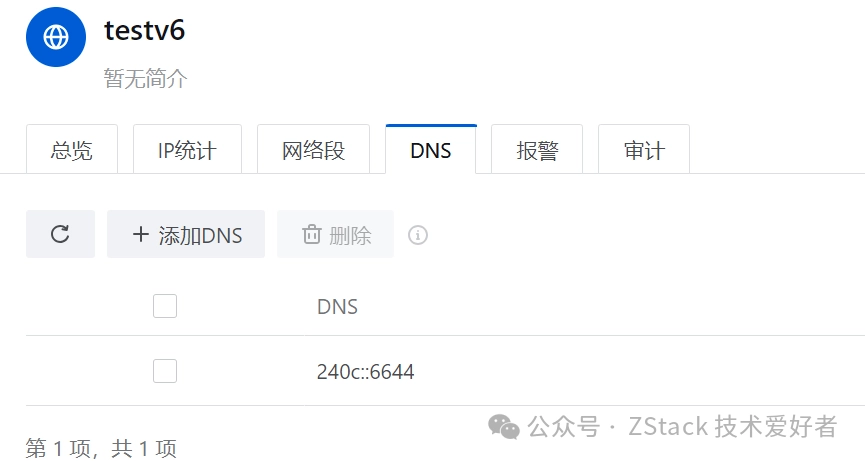
To configure IPv6 DNS, you can use DNS such as Alibaba IPv6 DNS:2400:3200::1,2400:3200:baba::1
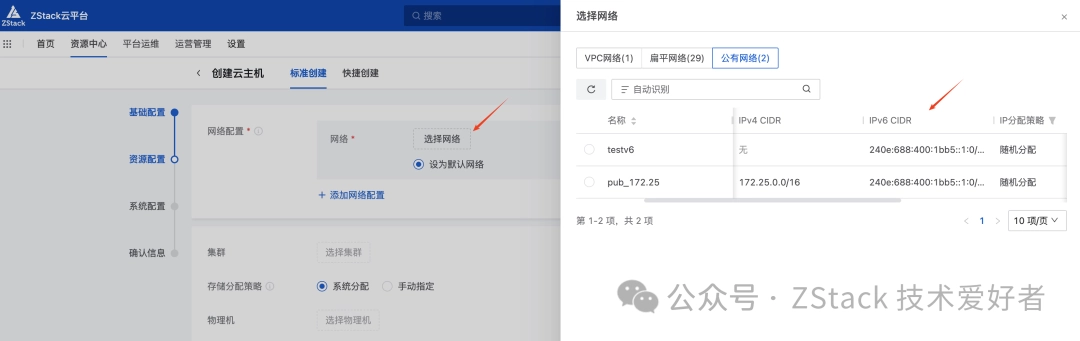
Creating a cloud host and using this network is not much different from using an IPv4 network. ZStack Cloud supports directly selecting an IPv6 only network or a dual-stack network:
View the interface address and ipv6 routing


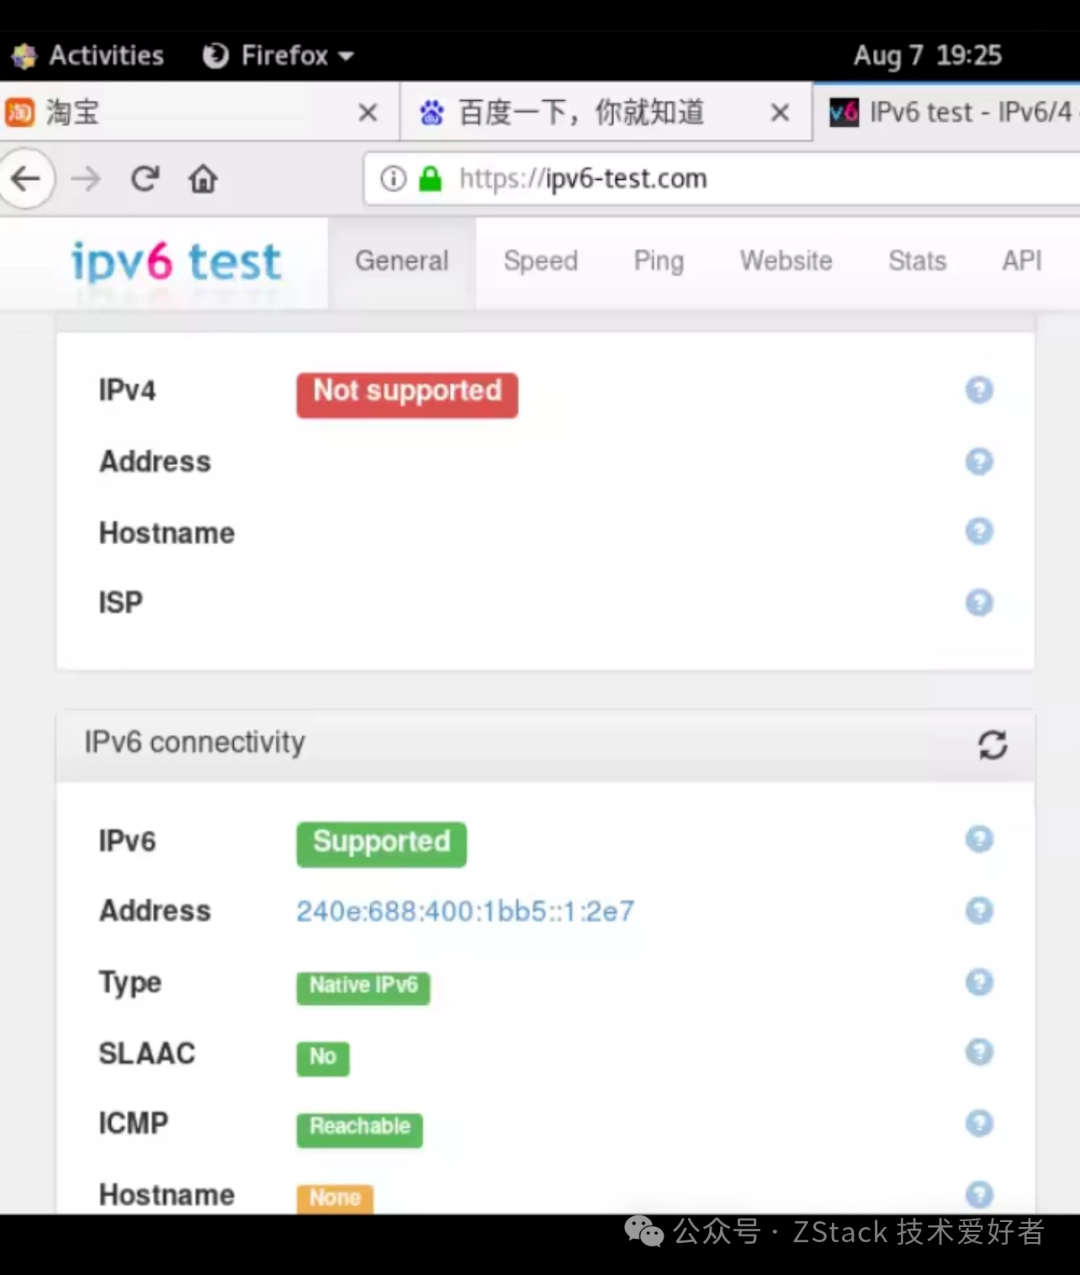
You can use a browser to open Baidu, JD.com, and Taobao. Commonly used websites already support IPv6 access.

You can also open the ipv6-test website to test it, and you can see that the website can normally obtain the IPv6 address of the local machine.
It is very simple to configure IPv6 network in ZStack Cloud, but IPv6 network configuration inside cloud hosts often encounters various problems. The following will show you how to correctly configure the network of CentOS 7 and CentOS 8 cloud hosts through specific problems one by one.
Create a flat network and add an IPv6 address segment 2024:8:6:86:1::/96, Enable DHCP function to create cloud host (using CentOS 7.4 as an example) Start the cloud host and wait for OS to start. You will find that there is only link local address starting with fe80 on the interface, and no IPv6 global address2024:8:6:86:1:0:11:5612. The DHCP function has been turned on on the network, why does the cloud host not obtain an IPv6 address?
# ip add show eth0
2: eth0: <BROADCAST,MULTICAST,UP,LOWER_UP> mtu 1400 qdisc mq state UP qlen 1000
link/ether fa:e0:9b:fb:96:00 brd ff:ff:ff:ff:ff:ff
inet6 fe80::f8e0:9bff:fefb:9600/64 scopelink
valid_lft forever preferred_lft forever
CentOS 7 uses network.service to configure interfaces
# systemctl status network
● network.service – LSB: Bring up/down networking
Loaded: loaded (/etc/rc.d/init.d/network; bad; vendor preset: disabled)
Active: active (running) since Tue 2024-08-06 14:41:00 CST; 2min 53s ago
Docs: man:systemd-sysv-generator(8)
Process: 652 ExecStart=/etc/rc.d/init.d/network start (code=exited, status=0/SUCCESS)
CGroup: /system.slice/network.service
├─882 /sbin/dhclient -6 -1 -lf /var/lib/dhclient/dhclient6–eth0.lease -pf /var/run/dhclient6-eth0.pid eth0
/etc/rc.d/init.d/networkIs a shell script that reads the interface configuration file such as/etc/sysconfig/network-scripts/ifcfg-eth0, initialize the interface according to the configuration parameters.
TYPE=Ethernet
PROXY_METHOD=none
BROWSER_ONLY=no
BOOTPROTO=dhcp
DEFROUTE=yes
IPV4_FAILURE_FATAL=no
NAME=eth0
DEVICE=eth0
ONBOOT=yes
MTU=1400
Obviously, this interface configuration does not have IPv6 configuration. Therefore, we add IPv6 configuration
TYPE=Ethernet
PROXY_METHOD=none
BROWSER_ONLY=no
BOOTPROTO=dhcp
DEFROUTE=yes
IPV4_FAILURE_FATAL=no
NAME=eth0
DEVICE=eth0
ONBOOT=yes
MTU=1400
IPV6INIT=yes####Open the ipv6 function on the interface
IPV6_DEFROUTE=yes
IPV6_FAILURE_FATAL=no
IPV6_ADDR_GEN_MODE=stable-privacy
DHCPV6C=yes####Use DHCP to obtain an IPv6 address
systemctl restart network, you can see that the interface address has been configured successfully:
eth0: <BROADCAST,MULTICAST,UP,LOWER_UP> mtu 1400 qdisc mq state UP qlen 1000
link/ether fa:e0:9b:fb:96:00 brd ff:ff:ff:ff:ff:ff
inet6 2024:8:6:86:1:0:11:5612/64 scope global dynamic
valid_lft 7419sec preferred_lft 7119sec
inet6 fe80::cc39:623b:c5ef:9f53/64 scopelink
valid_lft forever preferred_lft forever
####The phenomenon is still the above example, the IPv6 address segment of the flat network configuration:2024:8:6:86:1::/96, but the address with prefix length 64 is shown in ip add. Is there something wrong with the DHCP server of the cloud platform?
First, let’s study the DHCPv6 protocol document. We can see that DHCPv6 cannot pass the IPv6 address prefix length and gateway address. These are passed to the cloud host through the router device sending a RA (Router Advertisement) message. This is a major difference between IPv4 and IPv6. You cannot apply IPv4 experience to IPv6 practice.
After the IPv6 cloud host is started, it will wait for the router to send an RA message. The routing announcement contains two tags: M tag and O tag (some documents also call it A tag):
Management can also be used directlydhclientCommand to obtain IPv6 address or other parameters.dhclient -SThe parameter can only get the parameters without getting the IPv6 address.
Therefore, in the flat network of the ZStack platform, when configuring IPv6 address segments in the public network, it is necessary to cooperate with the physical router.
Stateful DHCP M = 1, O = 1
Stateless DHCP M = 1, O = 0
SLAAC M = 0, O = 0
For information on how to configure route advertisements and route advertisement tags on a physical router, refer to the router configuration manual.
Back to the question itself, how is the prefix length configured by dhclient for the cloud host generated? The dhclient source code uses a fixed value of 64. However, the default value is changed to 128 in the new version (such as 4.3.6), and this default value can be changed through command line parameters.
In the previous example, CentOS 7 usesnetwork.servicemanagement interface. However, many new distributions useNetworkManagerManagement interface, how to use nmcli to configure the interface?
Let’s take Centos 8 as an example to create a Centos8 cloud host. The network card is an ipv6 network. You need to use the following command to configure the interface
nmcli conn addtypeethernet ifname ens3 con-name ens3
nmcli connection modify ens3 ipv6.method dhcp
nmcli connection modify ens3 ipv4.method disabled#######If it is a dual-stack network card, ipv4.method is set to auto, and for a pure ipv6 network card, it must be set to disabled
nmcli connection modify ens3 ipv6.dhcp-duid ll
The configuration parameters of nmcli are stored in:/etc/sysconfig/network-scripts/ifcfg-ens3
TYPE=Ethernet
PROXY_METHOD=none
BROWSER_ONLY=no
DEFROUTE=yes
IPV4_FAILURE_FATAL=no
IPV6INIT=yes
IPV6_AUTOCONF=no
IPV6_DEFROUTE=yes
IPV6_FAILURE_FATAL=no
IPV6_ADDR_GEN_MODE=stable-privacy
NAME=ens3
UUID=61d820a1-be89-4fd7-a13d-4edef880a85c
DEVICE=ens3
ONBOOT=yes
DHCPV6_DUID=ll
DHCPV6C=yes
After restarting the cloud host
ens3: <BROADCAST,MULTICAST,UP,LOWER_UP> mtu 1450 qdisc mq state UP group default qlen 1000
link/ether fa:a0:46:ad:44:00 brd ff:ff:ff:ff:ff:ff
inet6 2024:8:6:86:1:0:49:c77b/128 scope global noprefixroute
valid_lft forever preferred_lft forever
inet6 fe80::3a7a:5e1b:f1b6:29cf/64 scopelinknoprefixroute
valid_lft forever preferred_lft forever
Note that the prefix length here is 128, this is becausedhclientNew version defaultprefixThe length is 128. ButnmcliNo API is provided to modify the defaultprefixlength.
ipv6.dhcp-duidCan be set to ll, llt:
It is recommended to use ll. The DUID must be consistent on the cloud host and the cloud platform’s DHCP server. Using ll can reduce the allocation failure caused by inconsistent information on both sides.
Continuing with the previous example, clone the previous cloud host into a new cloud host. After booting it, you will see the following:
ens3: <BROADCAST,MULTICAST,UP,LOWER_UP> mtu 1450 qdisc mq state UP group default qlen 1000
link/ether fa:1a:80:5c:d4:00 brd ff:ff:ff:ff:ff:ff
inet6 2024:8:6:86:1:0:48:80db/128 scope global noprefixroute
valid_lft forever preferred_lft forever
inet6 fe80::3a7a:5e1b:f1b6:29cf/64 scopelinkdadfailed tentative noprefixroute#########IP conflict detection failed
valid_lft forever preferred_lft forever
inet6 fe80::7c4e:d940:e5e1:20aa/64 scopelinknoprefixroute
valid_lft forever preferred_lft forever
There are two interfacesfe80Address, wherefe80::3a7a:5e1b:f1b6:29cf/64The status isdadfailed. Take a closer look, this address is the address of the previous cloud host.
Why is that?
This requires understanding a new parameter:ipv6.addr-gen-mode. It can be configured as:eui64,stable-privacy. The default isstable-privacy.
|
type |
meaning |
|
stable-privacy |
Generate fe80 address based on /var/lib/NetworkManager/secret_key and interface name |
|
eui64 |
Generate fe80 address based on interface mac address |
Obviously, the cloned cloud host,secret_key,Interface NameIf the address is the same as the original cloud host, a conflicting address will be generated. After the conflict is found,secret_keyAsseed, generate a random number + interface name to generate a newfe80, if the addresses generated three times conflict, the algorithm ends. So it is recommended to useeui64.
nmcli conn modify ens3 ipv6.addr-gen-mode eui64
When testing CentOS 7 earlier, the default prefix length was 64, and the cloud host generated aprefix 64However, after upgrading to CentOS 8, this error no longer exists.
# ip -6 r
::1 dev lo proto kernel metric 256 pref medium
2024:8:6:86:1:0:48:80db dev ens3 proto kernel metric 100 pref medium
fe80::/64 dev ens3 proto kernel metric 100 pref medium
# ping6 2024:8:6:86:1:0:49:c77b
connect: Network is unreachable
Therefore, the two cloud hosts cannot be pinged directly.
In order to help users quickly learn IPv6 when the physical router is not configured properly, ZStack provides an enhanced function to open the global configuration:
admin >>>UpdateGlobalConfig category=l3Network name=basic.network.enable.ra value=true
{
“inventory”: {
“category”:”l3Network”,
“defaultValue”:”false”,
“description”:”enable ipv6 RA for basic network”,
“id”: 1923,
“name”:”basic.network.enable.ra”,
“value”:”true”
},
“success”:true
}
Then create an IPv6 network and a cloud host.
# ip -6 r
::1 dev lo proto kernel metric 256 pref medium
2024:8:6:86:1:0:48:80db dev ens3 proto kernel metric 100 pref medium
2024:8:6:86:1::/96 dev ens3 proto kernel metric 256 expires 86392sec pref medium##### Correct prefix
fe80::/64 dev ens3 proto kernel metric 100 pref medium
# ping6 2024:8:6:86:1:0:49:c77b
PING 2024:8:6:86:1:0:49:c77b(2024:8:6:86:1:0:49:c77b) 56 data bytes
64 bytes from 2024:8:6:86:1:0:49:c77b: icmp_seq=1 ttl=64 time=0.173 ms
64 bytes from 2024:8:6:86:1:0:49:c77b: icmp_seq=2 ttl=64 time=0.245 ms
64 bytes from 2024:8:6:86:1:0:49:c77b: icmp_seq=3 ttl=64 time=0.302 ms
Some OS do not accept ra messages by default, and you need to modify the GuestOS settings
sysctl -w net.ipv6.conf.ens3.accept_ra=1
sysctl -w net.ipv6.conf.ens3.accept_ra_pinfo=1
The GuestOS that uses network.service to manage the network requires the following configuration:
IPV6INIT=yes# Enable ipv6 function on the interface
IPV6_DEFROUTE=yes
IPV6_FAILURE_FATAL=no
IPV6_ADDR_GEN_MODE=eui64
DHCPV6C=yes#Use dhcp to obtain an IPv6 address
The GuestOS that uses NetworkManager to manage the network is configured as follows:
nmcli conn addtypeethernet ifname ens3 con-name ens3
nmcli connection modify ens3 ipv6.method dhcp
nmcli connection modify ens3 ipv4.method disabled#If it is a dual-stack network card, ipv4.method is set to auto, and for a pure ipv6 network card, it must be set to disabled
nmcli connection modify ens3 ipv6.dhcp-duid ll
nmcli conn modify ens3 ipv6.addr-gen-mode eui64
sysctl -w net.ipv6.conf.ens3.accept_ra=1
sysctl -w net.ipv6.conf.ens3.accept_ra_pinfo=1
 2025-02-05
2024-12-12
2024-10-24
2024-09-21
2025-02-05
2024-12-12
2024-10-24
2024-09-21